Posts

Showing posts from 2019

Bench Power Supply - DIY Upcycle

Image
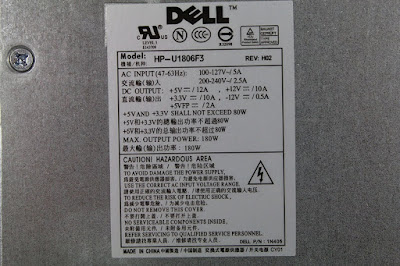
I've wanted a decent bench power supply for a few years and had been making do with assorted plug-in units with different voltages for various projects and experiments. I was thinking of buying a workshop supply on AliExpress, but an article in Hackspace magazine warned about cheap units with inadequate or non-existent earth connections to their metal cases, so I shelved that idea. I was stripping out an old Dell commercial grade desktop and ended up with a nice 180 watt power supply which was a long thin shape as opposed to the standard square ones and I decided to use this as the basis for a DIY workshop power supply. This provides plenty of current at the 3 main voltages I needed, 3.3v, 5v and 12v. I wanted at least one variable output as well and had in mind a small project I saw in an electronics magazine a few years ago using a modified cheap buck converter, which I'll come back to later. I wanted to use as many salvaged and recycled parts as possibl

Genie Microcontroller Homework

Image
My son came home at the end of term with his technology electronics project, which unfortunately didn't work. I'm not sure what sort of a mark or grade he got for this, his end-of-term report hasn't appeared just yet. Anyway, I thought it would be fun to have a go at fixing it for him. The project is based on a Genie C08 microcontroller which is a PIC 12F683 8-pin running custom firmware, essentially a serial bootloader. The Genie software is a free download which was handy, but I didn't have a Genie programming cable and didn't fancy spending £15 buying one when I thought I could probably bodge a programmer using parts I already have. The first issue was getting the Genie Programming software running on Linux. I had a version of the Wine Windows abstraction layer (Wine Is Not an Emulator) on my workshop computer downloaded from the Linux Mint repository, but this turned out to be wildly out of date, so I uninstalled it and and downloaded the latest version

Upcycling Old Laptop Displays

Image
A couple of years ago I acquired one of these, a Zoostorm Fizzbook Spin, a swivel screen netbook which had been aimed at the school sector and in particular at pupils with special and additional needs. It came out just before the first tablet computers hit the market and was made obsolete pretty quickly. It was an interesting piece of kit and I upgraded the RAM and hard drive and put Linux Mint on it (of course). Anyhow, I needed a clear out and the Fizzbook wasn't being used for much, but the display intrigued me because it had an integrated resistive touchscreen so I decided to try something out. I dismantled the computer and carefully recovered the display, which turned out to be a HannStar HSD101PFW2 (10.1 inch) with LED backlighting. A quick trip into eBay and I was able to find a controller board for this display complete with remote control for £20 postage paid from the Shenzhen SEZ. The controller board arrived in about 10 days and simply plugs into t

Another TV Repaired!

Image
This Freegle donation is a 32-inch JVC Smart television with LED backlight. The set was powering up, but no picture, so the backlight was suspect. The very bright torch trick revealed a picture lurking in the murk, so the set was worth repairing. The power supply was putting out 94-volts to the backlight which seemed excessive, but before I could investigate further I managed to short something and the output dropped to just 30-volts. I decided to take a chance on a replacement power board off eBay and while that was on its way I dismantled the television to take a look at the LEDs. The diode test setting on my DMM (digital multi-meter) was reading open-circuit, but across a lot of LEDs this doesn't always mean anything. Carefully taking the thing apart and putting the LCD panel to one side, I discovered that there were 22 LEDs, but one had already been removed and soldered over so someone had previously tried repairing the set. The problem with this shorting-out approach is

LED DIY Replacement Lamps

Image
I was given 4 interesting decimal digit displays some years ago which had been part of airfield equipment which was being upgraded. These use 10 tiny 28-volt bulbs for each digit, each illuminating a clear plastic slide etched with the numbers 0-9, a precursor to the 7-segment display. I wanted to upgrade the displays to LED illumination with the possibility of building a retro clock of some sort. The bulbs are a miniature T1-3/4 size which are 5mm, but have a wider flange so a 5mm white LED wouldn't be a direct replacement. 12-volt LEDs are available in the T1-3/4 size, but at about £3 each this would cost me £120 to replace all 40 so that was a nonstarter. After some thought, I hit on this alternative. M5 washers with a 10mm outer diameter, solder the anode to the washer and bend the cathode roughly into the middle. Cheap and works!

Skoda Rapid Heater Re-circulation Motor Repair

Image
In the autumn of 2018 the heater re-circulation motor (I'll refer to this as the HRM from now on) in my 2015 Skoda Rapid decided to fail. It had been making a grinding and clicking noise for a while and I had asked the local Skoda dealer to look into this during a routine service, which they didn't, but more on that later. The problem was that the motor failed in the re-circulate setting so the interior of the car steamed up very quickly and the windscreen couldn't be de-misted. Putting the air-conditioning on was a short-term solution up until the outside temperature dropped below 10 Celsius and that stopped working! There isn't a lot of information online about the Rapid because it is a less common model than other Skodas, but it shares a lot of design with the Fabia and Octavia so it wasn't too hard to get diagrams showing where the motor was and how it works. To get at the HRM I had to remove the glove box (7 Torx screws) and the heater motor (5 Torx screws),

Repaired Digital Camera

Image
I forgot to photograph this repair while I was doing it and it was a fiddly one too. My wife gave me her old 8 MP Samsung digital camera, modern equivalent of an Instamatic really, but it has a decent zoom lens. The problem was that two batteries had been left in it and contrary to popular belief even Duracell batteries will leak if left long enough (a couple of years). In this case one had corroded the positive spring contact which fell out. Probably some chemical electrolysis reason, but I only have a B at O-level, so not an expert. After carefully dismantling the camera, I was able to solder a small spring to the base of the battery connection which thankfully was still intact (right-hand contact in the bottom photograph). Reassembled the camera and it's working a treat. Just need a glamorous model now to make the repair worthwhile!

ESP8266 WiFi IoT Experiments

Image
This is experiment number 2 in the world of the Internet of Things and the amazing ESP8266 modules. After developing a basic software on the WeMos D1 ESP board (bottom photo), which is Arduino compatible, I built this test rig for the tiny ESP-01 module. This allows programming via a USB-to-serial module and is powered by a modified 3.3 volt converter (on the right). The software was easily ported across and is now sending temperature data to a Google Sheet via a webhook on the IFTTT service (If This Then That). The ESP-01 only has 2 I/O pins (GPIO), but if serial communication isn't needed that goes up to 4. Using a 2-wire I2C bus seems to be the way to go to add displays, sensors and keypads. The only problem was that the Arduino ESP libraries on my workshop PC seem to be different to my other PC and causing compile errors. Might need to do a clean reinstall. ESP-01 Test Rig WeMos D1 Board

Home Brew Digital Assistant 2

Image
Stand and speaker box glued to the back of the tablet with strong epoxy. Always worth curing the glue by leaving the work on a radiator for a few hours. The speaker box was recovered from an old Apple iMac and gives a better quality sound compared to the tiny speaker which was originally in the tablet.

Home Brew Digital Assistant 1

Image
This is phase 1 of turning an old Android tablet into a (sort of) digital assistant. The tablet is another Freegle donation which had failed because the battery had died which in turn was interfering with the power circuit. I removed the battery so the tablet just runs off a 5-volt power supply. I want the unit to have a fixed stand and decided to have a go at bending a piece of light perspex. A bit of old Internet research suggested that a hot bending bar would work. One of the bars I rescued from a dead printer was pressed into service along with my blowtorch. Plenty of heat and a bit of bending worked pretty well. Next step is to glue the stand to the back of the tablet, glue the speaker enclosure to the back of the stand and spray the whole thing, probably gloss white.