Posts

At last something that works...
Image
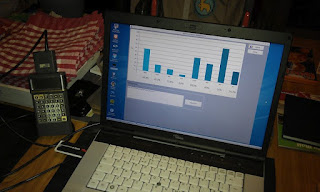
Okay, I now have a working Gambas program that will read a formatted RS232 data stream and display the data as a dynamic bar chart.  To test this I rigged up my trusty old Psion II LZ and wrote a little OPL (Psion programming language) script to output a suitable random data stream.  The project is running on a laptop at the minute because I haven't gotten Gambas onto the RasberryPi yet and apparently it is quite slow, but I love the graphics. The system is designed to work with 8 sensors and the data is 10-bit (values between 0-1023), so the format of a data frame is (at the moment) 18 bytes as follows - - 'A' as the start character, the program reads data and ignores it until it receives an A; - Pairs of bytes representing the upper and lower 5 bits of the 8 10-bit data values; - 'B' as a terminating character. To avoid confusion and make debugging easier, the 5-bit data is sent as bytes in the decimal range 32-63.  The ASCII codes for A and B are 65 an...

50 Shades of Raspberry

Image
I got around to finishing off the repair of the DVI/HDMI monitor and here it is re-assembled and running a test with the RaspberryPi computer.  The RaspberryPi is temporarily in a simple Lego box to keep it from being damaged.  The connecting HDMI-to-DVI-D video cable came out of DiscountNI of all places for just £2.99, which was a real result. The small (and very tidy) power supply came out of an obsolete PC and I re-wired the mains input and removed all of the output connections before re-connecting one disk drive power cable with 2 Molex male connectors on it to provide 12v and 5v to the monitor. At the monitor side, I stripped out the parts connecting the broken internal power supply to the main circuit board (mainly the isolating transformer) and re-cycled a Molex female connector from an old DVD drive as a power input connection.  Some heat-shrink sleeving and couple of cable ties to neaten things up and the monitor is now running off the external p...

Raspberry Jam

Image
Well, here's the proof that I finally got hold of a RaspberryPi computer (for £25 including p&p).  The odd arrangement of the monitor has its own story of course.  I was given this Hanns-G LCD monitor recently by another kind Freegler, but the power supply was faulty.  What made it worth fixing was the DVI interface which can be directly connected to HDMI and HDMI is what the RaspberryPi outputs. So I took it apart and found that it was basically running off 12v and 5v which was easy enough to test rig from an old mini-PC power unit.  The monitor has a good crisp image and once I tidy the wiring up a bit it will be fine for use with the RaspberryPi.  The HDMI-to-DVI cable was £2.99 out of a local discount shop.  Always worth a look in Poundland, World of Pound, Home Bargains and the other discount shops, you never know what they have. For the time being, we built a Lego box for the RaspberryPi, pretty much from scratch.  The sticker on th...

At the coal face

Image
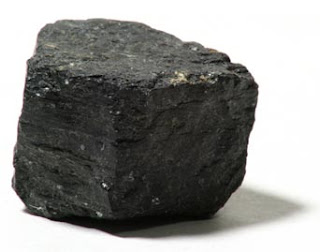
An early analysis has shown that we have saved £750 this winter in reduced fuel costs by installing the new multi-burning stove.  Taking into account that this was a mild winter, the whole install will break even in just over 3 years.  The oil tank was filled a year ago and is still 1/4 full (so around 900l used) and we have used roughly a tonne of coal, giving a total fuel cost of around £750 for winter heating.  This compares with around £1500 in the last winter when we were on oil only. Phoenix Gas have been delivering a mail shot in our area (again) offering a piped natural gas service.  When I 'phoned up (again) to order it they told me (again) that it isn't available in our area.   Should they consider targeted marketing perhaps?

DIY Touch Screen

Image
This mini touch screen is now working (incredibly) and gives some ideas on how a screen of any size could be interfaced to the Raspberry-Pi, when it arrives. There are no special interface ICs being used here, just 4 transistors and some discrete components to let the PIC microcontroller (18F4620 in this case) control the power into the resistive panel and then read the relevant voltage to determine the X and Y coordinates of the pressed point. For simple applications like an on-screen keypad, ON/OFF control and so on, this is adequate and with improved software (averaging and use of interrupts) it could be much more accurate. The interface circuit requires 4 lines of I/O, 2 digital outputs and 2 analogue inputs. The touch screen was salvaged out of a cheap PDA which had stopped working and the graphical LCD ( GLCD ) is a standard KS0108 driven via a bespoke I2C 2-wire interface I bought on eBay although in future I would just interface one of these directly to the PIC.

Idling along

Image
The MR2 has suffered idling problems almost since the day I bought it 10 years ago. It will run along fine for a while until it warms up and then the idle gets erratic after a while, it will over-rev and then conk out at junctions just to embarrass you. Last year I cleaned up and checked over all the plugs and leads and put a new distributor cap and rotor arm on and this improved things a bit, but not much, so this year I'm looking (finally) at the induction side of things. This is the Air Flow Meter ( AFM ) on the bench. This is a heavily-made piece of kit compared to the rubbish plastic hot wire ones you get nowadays. It tested out fine and cleaned up nicely. This is the throttle body removed and cleaned up a bit. The throttle position sensor ( TPS ) is the black thing on the left and the Idle Speed Control Valve ( ISCV ) is the part on the right. The TPS seems to be okay although it needs adjusting a bit, but when I took the ISCV off, all was revealed (maybe). There are...

Back to the Future

Image
A year ago I started playing around with Google App Inventor and built a few test applications for my old £20 Android tablet . App Inventor has been taken over by MIT, who built the Apollo Guidance Computer that took men to the Moon, so they have a fair idea what they are doing and it has been re-launched in a new beta form. Now I have the Scroll Essential tablet, I decided to go back to this and it looks quite good, but the problem is that the Scroll has no drivers for either Bluetooth or Serial-USB so it can't communicate with anything. I've been investigating how to load modules (drivers) into the Android kernel, but it is no trivial task and might not be possible; a real shame as this would be the ultimate sub-£100 car computer. App Inventor (MIT) running under Windows XP